Chapter 5 Assessment:
Questions:
1) What kind of electrical connection is a whisker?
The whiskers are tactile switches. A tactile switch may detect when a robotic arm, or whisker, has encountered an object and it contains inputs that dictate some other form or programmed output.
2) When a whisker is pressed, what voltage occurs at the I/O pin monitoring it? What binary value will occur in the input register? If I/O pin P8 is used to monitor the input pin, what value does IN8 have when a whisker is pressed, and what value does it hav when a whisker is not pressed?
When a whisker is pressed, the I/O pin voltage is zero volts. The binary value that shows in the input register is zero. If I/O pin P8 is used to monitor the input pin, IN8 value is zero when the whisker is pressed, and the IN8 value is one when the whisker is not pressed.
3) If IN7 = 1, what does that mean? What does it mean if IN7 = 0? How about IN5 = 1 and IN5 = 0?
If IN7 = 1, it means that the whisker is not pressed and if IN7 = 0, it means that the whisker is pressed. If IN5 = 1, it means that the whisker is not pressed, and if IN5 = 0, then it means that the whisker is pressed.
4) What command is used to jump to different subroutines depending on the value of a variable? What command is used to decide which subroutine to jump to? What are these decisions based on?
The command that is used to jump to different subroutines depending on the value of the variable is the GOSUB command. The command that is used to decide which subroutine to jump to is the IF…THEN command. The decisions are based on whether the IF…THEN statement conditions are true or false.
5) What is the purpose of having nested IF…THEN statements?
The program can check for one condition and if the condition turns out to be true, then it checks for another condition within the first condition.
Exercises:
1) Write a DEBUG command for TestWhiskers.bs2 that updates each whisker state on a new line. Adjust the PAUSE command so that it is 250 instead of 50.
2) Using RoamingWithWhiskers.bs2 as a reference, write a Turn_Away subroutine that calls the Back_Up subroutine once and the Turn_Left subroutine twice. Write down the modifications you will have to make to the Main Routine section of RoamingWithWhiskers.bs2.


Projects:
1) Modify RoamingWithWhiskers.bs2 so that the Boe-Bot makes a 4 kHz beep that lasts 100 ms before executing the evasive maneuver. Make it beep twice if both whisker contacts are detected during the same sample.

2) Modify RoamingWithWhiskers.bs2 so that the Boe-Bot roams in a 1 yard (or meter) diameter circle. When you touch one whisker, it will cause the Boe-Bot to travel in a tighter circle (smaller diameter). When you touch the other whisker, it will cause the Boe-Bot to navigate in a wider diameter circle.

Chapter 4 Assessment: Questions, Exercises, and Projects
Questions:
1) What direction does the left wheel have to turn to make the Boe-Bot go forward? What direction does the right wheel have to turn?
The left wheel has to move counterclockwise while the right wheel has to move clockwise because both wheels have to move at opposite directions.
2) When the Boe-Bot pivots to the left, what are the right and left wheels doing?
The left wheel is at the pulse width of 750 and isn’t moving while the right wheel is moving forward/clockwise. This makes the boe-bot start turning to the left.
3) If your Boe-Bot veers slightly to the left when you are running a program to make it go straight ahead? How do you correct this? What command needs to be adjusted and what kind of adjustment should you make?
The right wheel has to be slowed down because if the boe-bot veers to the left it means that the right wheel is not moving at the same speed as the left wheel, thus making the boe-bot move more to the left direction. The PULSOUT command is the command needed to be adjusted and to make the right wheel slower, it means that the PULSOUT for the right wheel has to be closer to 750.
4) If your Boe-Bot travels 11 in/s, how many pulses will it take to make it travel 36 inches?
The given is that the boe-bot travels at 11 in/s. The equation I have to work out is “pulses = boe-bot distance/boe-bot speed” multiplied by 40.65 pulses. The answer I got is that the boe-bot has to have 133 pulses.
5) What’s the relationship between a FOR…NEXT loop’s Counter argument and the PULSOUT command’s Duration argument that makes ramping possible?
The FOR…NEXT loop’s counter argument can be used in the PULSOUT command’s duration argument to allow ramping by using the + or – signs in the PULSOUT command. For example, to allow ramping, the PULSOUT command can be “PULSOUT 13, 750 + pulseCount” and “PULSOUT 12, 750 – pulseCount”. 750 just means that the wheels are not moving and are at a complete stop.
6) What directive can you use to pre-store values in the BASIC Stamp’s EEPROM before running a program?
The DATA directive
7) What command can you use to retrieve a value stored in EEPROM and copy it to a variable?
The READ command
8) What code block can you use to select a particular variable and evaluate it on a case by case basis and execute a different code block for each case?
SELECT…CASE…ENDSELECT can be used to select a particular variable and evaluate it on a case by case basis used to execute a different code block for each case.
9) What are the different conditions that can be used with DO…LOOP?
The different conditions that can be used with DO…LOOP are UNTIL and WHILE.
Exercises:
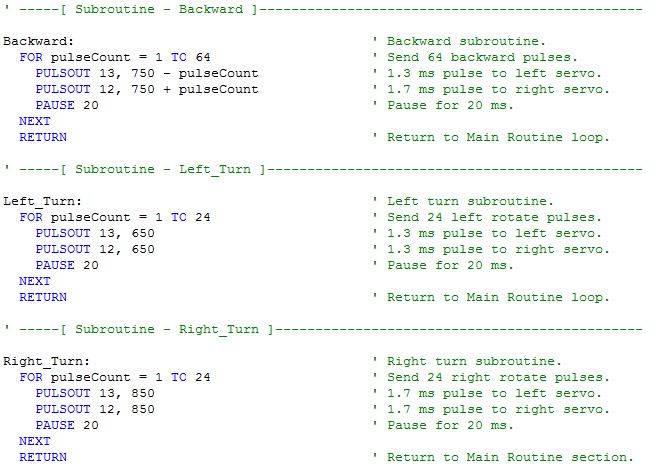
1) Write a routine that makes the Boe-Bot back up for 350 pulses.
FOR counter = 1 to 350
PULSOUT 13, 708
PULSOUT 12, 880
PAUSE 20
NEXT
(For this exercise, I just had to make a FOR…NEXT command that contained the same PULSOUT values as the one I tested for the boe-bot to move backward in a straight line. For my boe-bot, the PULSOUT values were 708 for right and 880 for left.)
2) Let’s say that you tested your servos and discovered that it takes 48 pulses to make a 180 degree turn with right-rotate. With this information, write routines to make the Boe-Bot perform 30, 45, and 60 degree turns.
30 Degrees:
FOR counter = 1 to 8
PULSOUT 13, 850
PULSOUT 12, 850
PAUSE 20
NEXT
45 Degrees:
FOR counter = 1 to 12
PULSOUT 13, 850
PULSOUT 12, 850
PAUSE 20
NEXT
60 Degrees:
FOR counter = 1 to 16
PULSOUT 13, 850
PULSOUT 12, 850
PAUSE 20
NEXT
(For this exercise, I had to apply math to find out the amount of pulses needed for each degree turns. For example, for the 30 degree turns, I had to solve the proportion: 48/180 = x/30″. Since I knew that 48 pulses made a 180 degree turn, then I had to figure out x, which was the amount of pulses needed in a 30 degree turn. I got the approximate answer of 8.)
3) Write a routine that makes the Boe-Bot go straight forward, then ramp in and out of a pivoting turn, and then continue straight forward.
FOR counter = 1 to 66
PULSOUT 13, 802
PULSOUT 12, 650
PAUSE 20
NEXT
FOR counter = 1 to 22
PULSOUT 13, 750 + pulseCount
PULSOUT 12, 750
PAUSE 20
NEXT
FOR counter = 22 to 1
PULSOUT 13, 750 + counter
PULSOUT 12, 750
PAUSE 20
NEXT
FOR counter = 1 to 66
PULSOUT 13, 802
PULSOUT 12, 650
PAUSE 20
NEXT
(For this exercise, I had to make multiple FOR…NEXT commands. First, I had to write a FOR…NEXT command for the boe-bot to go straight forward, then ramping in a pivoting turn and then straight forward again. For the FOR…NEXT command for the boe-bot to go straight forward, I used the same PULSOUT values that I tested that made the boe-bot go in a straight line in one of the earlier activities. For the ramping for the pivoting turn, I had to use + pulseCount and do 1 to 22 for the FOR counter value to start the ramping and 22 to 1 in the next FOR counter value to make the boe-bot slow down.)
Projects:
1) It is time to fill in column 3 of Table 2-1: PULSOUT Duration Combinations on page 81. To do this, modify the PULSOUT DURATION arguments in the program BoeBotForwardThreeSeconds.bs2 using each pair of values from column 1. Record your Boe-Bot’s resultant behavior for each pair in column 3. Once completed, this table will serve as a reference guide when you design your own custom Boe-Bot manuevers.

(For this project, I didn’t need to experiment for every PULSOUT value because some of them were the standard PULSOUT values for the basic manuevers. For example, 750 for both wheels meant that the boe-bot would be at a full stop because both wheels wouldn’t be moving, so I didn’t take long for this project.)
2) Figure-9 shows two simple obstacle courses. Write a program that will make your Boe-Bot navigate along each figure. Assume straight line distances (including the diameter of the circle) to be either 1 yd or 1 m.

The program I wrote for the circle was the one in the answer at the back of the chapter assessment because I couldn’t figure out how to write the program. For this project, I worked on it with my seatmate Christine, and the first thing we did was to take a yard stick and put it on the floor. We ran the program and noticed that the boe-bot moved in a circle that had a bigger diameter than 1 yard. We experimented with different PULSOUT values for the right wheel. We ended up with the PULSOUT value 717, which was the closest we could get to a 1 yard meter, even though the boe-bot went over the ruler since the circle was smaller than the length of the ruler. At first, I didn’t understand why the boe-bot kept on going over the ruler and we couldn’t find the right PULSOUT value because the boe-bot either moved way too far from the ruler or it kept on going over the ruler, until I finished Project 2 and realized that the yard stick was in fact about 2 inches longer than an actual yard, which is about 36 inches, so that was the reason the boe-bot made a circle that was smaller than the ruler because it wasn’t the right measurement.

For this project, I also used the program at the back of the chapter assessment and I also worked with Christine. The first thing we needed to do was to make a triangle with a side length of 1 yard on the floor using masking tape. Once we finished the triangle, we had to calculate the FOR counter for the forward. To do this, we had to use the equation “pulses=boe-bot distance/boe-bot speed x 40.65”. Christine’s boe-bot runs at about 8.6 inches per second while my boe-bot ran at about 7 inches per second, so our FOR counter values were different. When we ran the program, however, we found out that the boe-bot didn’t go the full distance of the masking tape we made and we figured out that the yard stick wasn’t 36 inches, but 38 inches, so we had to redo our triangle by taking off the extra two inches from each piece of tape. We also experimented on the FOR counter values for the rotating right 120 degrees, but the boe-bot ended up doing a trapezoid type of shape instead of a triangle, so we decided to use the same value as in the book.
One thing I found odd during class was that when I needed help on the projects part of the chapter assessment, the other people who already finished the chapter assessments said that they didn’t remember how to do it, so I had a hard time trying to figure it out myself, which resulted in me and Christine working together for both projects. I didn’t really understand how the other people finished their chapter assessment projects without using a ruler and making a masking tape in a figure of a triangle on the floor.
Day 14 – Finishing Activity #6 and Starting Chapter 4 Assessment
Today, I was able to finish my programs for Activity #6. I understood how the EEPROM program worked but I got confused in how to add the new subroutines for ramping in the program so that the boe-bot would move in a precise rectangle. At first, what I did was to add a new subroutine for every ramping up and down for each basic manuever. It ended up I made up to about 8 new subroutines! Next, I made multiple cases for each new subroutine. However, the problem I encountered next messed me up quite a lot. I didn’t know how to put all the different letters to fit in the DATA command. At first, I thought I had to add “101112” at the end of the original DATA command but then I realized that it wouldn’t make sense because the program would read “1” then “0” instead of the number “10”.
Being really confused up to this point, I turned to my seatmate who was Christine and asked her how to insert all the different letters. It turned out we both had the same problem, so Christine decided to call Adam to help us. He told us that we didn’t need to add new subroutines for every single ramping and we just had to add the ramping in the actual basic manuever routine. At first, I didn’t understand it until I realized that we only needed to ramp each manuever once instead of ramping up and ramping down separately. The edited program I did is shown below:


After editing the program, I moved on to the Your Turn part. First, I had to run my program, go to Run, and then I selected Memory Map. In there, I saw the instructions I did in the DATA directive highlighted in blue after I clicked the Display ASCII checkbox at the lower left corner of the window. Next, I had to modify the program so that I can make my boe-bot move forward, left, right, then backward (this is similar to what we did in the previous activities). I didn’t have any problems with this because I just had to change the DATA directive by rearranging the letters in the right order. After this, I added a second DATA directive and then I moved the letter “Q” at the end of the second directive, so that the commands would be executed in both the first and second DATA directive lines. I didn’t have any problems with this exercise and the program I used is shown below:


Chapter 4 Assessment Questions:
1) What direction does the left wheel have to turn to make the Boe-Bot go forward? What direction does the right wheel have to turn?
The left wheel has to move counterclockwise while the right wheel has to move clockwise because both wheels have to move at opposite directions.
2) When the Boe-Bot pivots to the left, what are the right and left wheels doing?
The left wheel is at the pulse width of 750 and isn’t moving while the right wheel is moving forward/clockwise. This makes the boe-bot start turning to the left.
3) If your Boe-Bot veers slightly to the left when you are running a program to make it go straight ahead? How do you correct this? What command needs to be adjusted and what kind of adjustment should you make?
The right wheel has to be slowed down because if the boe-bot veers to the left it means that the right wheel is not moving at the same speed as the left wheel, thus making the boe-bot move more to the left direction. The PULSOUT command is the command needed to be adjusted and to make the right wheel slower, it means that the PULSOUT for the right wheel has to be closer to 750.
4) If your Boe-Bot travels 11 in/s, how many pulses will it take to make it travel 36 inches?
The given is that the boe-bot travels at 11 in/s. The equation I have to work out is “pulses = boe-bot distance/boe-bot speed” multiplied by 40.65 pulses. The answer I got is that the boe-bot has to have 133 pulses.
This is how far I got in working last tech class. I decided I’m going to finish all the questions and exercises at home and hopefully be finished with it by the end of the spring break.
Day 13: Activity #6
In this class, I was able to start on Activity #6 and do the sample program but I didn’t get to finish due to the long time it took for me to type the sample program in the beginning of the activity. As of right now, I’m working on the part of the activity where I have to modify the program and add ramping and adjust the endvalues of the FOR counter commands so that the boe-bot will go in the shape of a rectangle.
I learned that the BASIC Stamp editor converts the program we type into tokens, which are basically numeric values used as the instructions for running the program. These tokens are then stored in one of the two smaller chips in our BASIC Stamp, which is called the EEPROM, and can hold 2 kbs of file size. I learned that EEPROM takes up to milliseconds to store a value, can accept about 10 million writes, and is usually used to store data.
In EEPROM programs, I need to use subroutines for each manuever (i.e. backward, forward, left turn, right turn) and each manuever is also represented by one letter. The efficient thing about the EEPROM program is that multiple letters can be put in a long line to execute lots of manuevers, unlike in subroutines.
Next, before I started writing the program, I had to learn about the new commands needed in an EEPROM program. The first thing I learned was the DATA directive. In the DATA directive, the long line of letters representing different maneuvers is entered there. In the diagram below, it’s an example of how the DATA directive works.
 In the DATA directive above, F stands for Forward, L for Left Turn, R for Right Turn, B for Backward, and Q for Quit. The DATA directive is telling the boe-bot to go “forward, left turn, forward, forward, right turn, backward, left turn, backward, backward, quit”. The quit command is essential for ending the program.
Next, I learned that every letter code in the EEPROM is stored as a byte and I learned about how the READ command can get the letters from the EEPROM while the program is being executed. A sample of the READ command is shown below:
 The address variable is where the location of each code letter is stored and the instruction variable will say the actual value of the byte. Next, I learned about the CASE…SELECT…ENDSELECT statement. In this statement, the variable is evaluated on a case-by-case basis according to each letter and then the subroutine is specified for each letter. Below is an example of the CASE…SELECT…ENDSELECT:
 The next thing I had to do was to type in the example program. It took me a bit of time to type in the whole program due to the length of it being long, so class time was almost finished when I finished typing and running the program. I didn’t have enough time to experiment on ramping the program. At first, I didn’t really understand how to edit the program to add the ramping but then I realized I needed to add a code letter for each of the ramping commands for each maneuver and modify the FOR…COUNTER values in each ramping subroutine. The example program I used is shown below but I didn’t get to edit it:


 Next class, I’ll make sure that I finish modifying the program with the ramping, since I know I’m behind compared to my other classmates who are already doing the projects in the Chapter 4 Assessment. I’m planning on finishing the exercises and projects in school and do the questions for Chapter 4 at home as homework if I don’t get enough time in class to finish. I want to do that because the exercises and projects can’t be done at home because I can’t test my programs because I don’t have the boe-bot with me at home. The questions will be easy to do since I have the PDF downloaded on my computer and I can easily reread sections from there.
Day 12: Activity 3, 4 and 5
For this technology class, we were supposed to finish all the Chapter 4 activities by the end of the class but I ran out of time when I was doing Activity 6. This class was interesting because I learned how to control the boe-bot more specifically. For example, instead of just going backward and forward at the same distance, I learned how to modify the program so that I can make the boe-bot go forward at a longer distance and then make the boe-bot go backward for a shorter distance than when it went forward.
I learned how to calculate distances in Activity #3. To calculate the distance the boe-bot should run, the equation is “servo time = boe-bot distance/boe-bot speed”. Before I could calculate the distance, I first have to figure out the speed at which my boe-bot runs. To do this, I had to type a program and use a ruler to measure how far the boe-bot traveled in one second. This is done so that I would know the rate of speed I’m going to use for my calculation equation. The program I used to make the boe-bot travel for one second is shown below:
 Next, I had to run the program and disconnect the USB cable and put the boe-bot next to the ruler. I tried to position the wheels of the boe-bot exactly like the diagram in the book, which is shown below:
 After positioning my boe-bot next to the ruler like the diagram above, I ran the program and observed how far the boe-bot moved. I was a bit excited to see the result because this is the first time I’ve actually measured the speed rate of the boe-bot. My result was that the boe-bot moved at 7 inches/second. I was surprised to find out that I can calculate distances for my boe-bot just by putting in a simple phrase, which was 7 inches/second, in my equation.
For the next step, I had to calculate the pulses for the endvalue of the FOR…NEXT command in my program. The equation for this is “pulses = boe-bot distance/boe-bot speed X 40.65/second”. Since I already know the boe-bot speed, I had to decide the distance my boe-bot would run. For my program, I picked the distance 12 inches. For my equation, I put “pulses = 12/7 x 40.65/1”. I then simplified it to “12/7 x 40.65 = pulses”. The answer I got was 69, so I modified my FOR…NEXT command and put “FOR counter = 1 to 69”, as shown below:
 Activity 3 was pretty simple and straightforward because it didn’t require any testing experiments on the PULSOUT commands and it required simple math skills.
The next activity is Activity #4. Activity #4 talks about ramping and it’s basically a way for the boe-bot to do commands that slows down or speeds up the servos instead of executing the commands by starting and ending the command abruptly. I also learned that this increases the efficiency of the batteries and the servos. To do ramping, I learned that I needed to put in variables and also modify the FOR…NEXT commands. In the first exercise, I only needed to use one variable, which was pulseCount and I learned how to put it in my program. I learned that the pulseCount changes the speed of the servos, so it’s important to pay attention to the + and – signs in the PULSOUT commands. At first, I couldn’t grasp the concept of using variables in the PULSOUT commands but I just thought about it as math equations and it started to make sense. The diagram below shows how the pulseCount variable influences the PULSOUT commands:
 As you can see, if it contains the + sign, then the servo speed is increased, while the – sign makes the servos go slower in order to achieve the ramping effect.
Next, I had to do write a program for ramping. It wasn’t hard to understand it because I already understood the concept on how ramping works and how the variables fit in the program. The program I did is shown below: (The program might look a bit messy because I had to use the snipping tool twice in order to screencap the whole program. Also, the line “PULSOUT 13, 750 + pulseCount” was accidentally screencapped twice.)


Next, I had to modify one of my old Robotics programs I did in Activity 2 so that I can use the ramping to make the servos speed up and slow down instead of executing the commands abruptly. I didn’t have any trouble on this except I messed up two times on the + and – signs of my PULSOUT commands, so my boe-bot was spinning around a couple of times but I was able to correct it easily. Although I made mistakes on the program, I felt like the boe-bot was more interesting when it moved forward, turned right, turned left, then did a swirling motion instead of when it did just the simple moving forward, turning right, turning left, then moving backward. While I was watching the boe-bot I was wondering if it was possible for me to write a program where the boe-bot moved in a swirling pattern, similar to a flower but it might take me long to do that. For now, I’ll just hold on to that idea and practice controlling the boe-bot in a square instead.
For Activity #5, I learned about the two parts of a subroutine. First is the subroutine call. The subroutine call command is My_Subroutine. This tells the program to jump to the reusable parts of the code and then come back after. The second part is the subroutine. The subroutine is basically everything from “My_Subroutine:” to the RETURN command. A diagram for the Subroutine is shown below:

Using this diagram, I learned how a subroutine works. First, when the program is run, the GOSUB command jumps to the My_Subroutine and starts executing the commands starting from there. After the pause, the program then goes back to the skipped parts of the program and executes the rest of the commands from there.
The first program I wrote for subroutines was very simple. It was just testing to see whether the subroutine worked properly and the messages were appearing in the right order it was supposed to be in. This was a very small and simple exercise and the program I used is shown below:

The messages that were supposed to appear on the DEBUG terminal were “Before subroutine, Command in subroutine, After subroutine” in that order and in three different lines. Subroutines reminded me of variables because they both needed to be stated in the program and then substituted in parts of a program.
After this, I had to do another program that had the same concept except high and low pitch sounds would be performed depending on the subroutine. The two pitch sounds for this program was high and low and the program is shown below:
 The result should be that a high pitch sound is first made, followed by the message “Back in main” in the DEBUG terminal, then a pause. This is then followed by a low pitch sound, followed by a message saying “Back in main again” in the DEBUG terminal, then another pause. After the pause, a message saying “Repeat…” should appear in the DEBUG Terminal and the whole program is then executed again due to the DO…LOOP command. This was also simple to do because it was similar to the first subroutine exercise.
Next, I was introduced to a new way of typing a program using subroutines. The result was the same as the ForwardLeftRightBackward.bs2 but it was just written in a different way. The program I used is shown below:

 I really felt as if the subroutines were similar to writing variables in programs, so it was very easy for me to understand this program. I didn’t have any problems with this program and it was really interesting to know that there were different ways to write programs that do the same thing. The next program I wrote is yet another way to write a program that does the same thing as the ForwardLeftRightBackward.bs2, and this program is shown below:

 For this program, I had to use variables and subroutines in a same program. First, I had to state the variables, then put them in the right command and then use the subroutine. This was one of the programs I found confusing and I’d rather use the two other ways to write a program in future projects I have to do.
The last thing I was able to do was to do the Your Turn part for the activity #5. For this, I had to modify my last program to make the boe-bot go in a square. To do this, I had to first modify the variables and the pulses. For the forward command, I had to modify the pulses to the same pulses I used when I was trying to make the boe-bot move forward in a straight line. After this, I had to add more forward commands after each turn so that it would move in the shape of a square. I’m not sure if I did it successfully based on the instructions on the book, but the boe-bot was moving in a square. The program I used is shown below:


 This is how much I was able to finish in class. I’m partly halfway through Activity #6 but I decided not to post it on this blog post, so that I can do a complete full detailed post about it next class instead of doing half here and half in another blog post.
Day 11: Activity 1 and 2 for Chapter 4
In this class, we started working on Chapter 4. In this chapter, we started to learn how to navigate the boe-bot and write programs that included commands to make the boe-bot move forward, backward, left, right and do different rotations.
The first thing I needed to work on was Activity 1. In this activity, I learned about the basic boe-bot maneuvers. I learned that in order for the boe-bot to move forward, the left wheel had to turn counterclockwise while the right wheel turned clockwise. Before I started this chapter, I thought that both wheels had to be turning in the same direction for it to move forward so I realized that it wouldn’t have worked because both wheels moving at the same time in the same direction would just make the boe bot end up turning on the same spot. The next thing I learned was how to write a program to make the boe-bot move forward. The example program for Activity One is shown below:
 Since this was the first time I’ve ran a program that made the boe-bot move forward, I was very excited to see how the PULSOUT command’s duration argument controlled the speed of the servo. I already knew about the pulsout command controlling the speed and direction of the servo, but it was a different experience to see the boe-bot moving actually moving forward depending on the PULSOUT command because in the previous chapters, we tested the speed and direction of the servos while it was on its nose and not actually moving.
The next thing I had to do was change the value in the FOR…NEXT command to 1 to 61 instead of 1 to 122. Because 122 was three seconds, and 61 is approximately one half of 122, then it means that the boe-bot will move half the time and half the distance than before. After this, I tried to experiment by changing the FOR…Next command to 122 to 61 and then to 1 to 244.
After this, I had to modify the PULSOUT command by changing the PULSOUT duration. Since I knew that both servos had to move at the opposite directions at full speed, then the program before used the PULSOUT durations of 850 and 650 so that it moved in full speed. However, I had to modify the PULSOUT duration so that both servos moved slower. For this, I had to type in 780 and 720. After running the program, I noticed that the boe-bot moved slower than previously because of the modified PULSOUT durations. The program I used is shown below:

I didn’t find anything challenging at this point because it was pretty much the same as the exercises we did before about PULSOUT commands and controlling the servos so it was basically a review on remembering how to program the servos to move clockwise and counterclockwise at full speed and vice versa.
Next, I learned about how to program the boe-bot to make it move backward, rotate, and pivot. The first thing I did was to write a program to make the boe bot move backward. It was pretty simple to understand the instructions in the book because it just flipped the PULSOUT durations for the right and left servos when it was programmed to move forward. The program I used is shown below:
 Next, I had to work on was making a program to make my boe-bot turn left (counterclockwise from above). To do this, I had to change the PULSOUT durations for both commands to 650. This was also easy to learn because I knew that both wheels turning at the same time would make the boe-bot move in a circle depending on the direction of the wheels turning. The program I used for this is shown below:
 I then had to do modify the PULSOUT duration command to make the boe-bot turn right. It wasn’t challenging because I knew that if 650 made the boe-bot turn left, then that means that 850 would make the boe-bot turn into the opposite direction because 650 and 850 turned in opposite directions.
Next, I learned about pivoting. I learned that to do this, I had to keep one of the wheels still while the other wheel moves. Basically this meant that if I left the right wheel still then moved the right wheel clockwise, then this would make the boe-bot pivot to the left. Overall, the first activity was pretty easy to follow and do because it was just like putting everything we learned before about programming into making the boe-bot move.
While working on Activity 2, which was about making the boe-bot travel straight, it took me a lot of time and experimenting before I finally managed to make the boe-bot move forward and backward in a straight line. Of course, the first thing I needed to do was to check whether my boe-bot moved more to the left or the right in ten seconds. To do this, I just used the first program I used in Activity 1 and changed the FOR…NEXT command to 1 to 407 because 407 is equal to ten seconds. The program I used to test my boe-bot moving straight is shown below:
 After running the program and setting my boe-bot on the ground, I realized that my boe-bot moved a bit to the right instead of a straight line. At first, I didn’t know which servo pulsout command to modify but then I figured out that both servos had to move at almost or the same speed in order for the boe-bot to move in a straight line. I experimented with changing the left servo by making it move slower and I was surprised to find out that lessening the speed of the left servo straightened the boe-bot’s movement in a straight line. I reread the book instructions and realized that the left servo moving at full speed was causing the boe-bot to move more to the right, so by lessening the speed of the left servo, the boe-bot would start turning more to the left. In the end, I ended up with 802 for the left servo and 650 for the right servo. The next thing I had to do was test the boe-bot if it went backward in a straight line for ten seconds. This time, the boe-bot moved more to the left so I had to adjust the right servo. I ended up with 770 for the right servo and 812 for the left servo.
I won’t be afraid to admit that I found it a very tiring task to experiment on the boe-bot and I was extremely impatient by the end of technology class. There was one time where I switched the pin number in both the pulsout commands so the pulsout durations were sent to the wrong servos and when the boe-bot ran, I was very shocked to find that it was pivoting instead of moving forward and I loudly exclaimed “Whoops!”, quickly picked up the boe-bot and turned it off, feeling a bit embarrassed that the boe-bot moved in the wrong way. After going back to the computer, I heard Mrs. T tell the class that we should watch our boe-bot’s movement carefully even if it does something wrong so we can analyze the problem and fix it properly instead of panicking when it does something wrong. After hearing this, I decided to try running the boe-bot with the program that made it pivot and then watched how it moved. I realized then that I had switched the pin numbers and corrected my mistake. I was later relieved that I had followed Mrs. T’s advice because I was able to correct my problem in a shorter time than if I had continued to panic over my mistake.
This is how far I was able to go in this technology class because it took me a long time to find out how to make my boe-bot move forward and backward in a straight line. I even needed help from Christine and Haziqah in finding the correct PULSOUT durations and I know it would have taken me longer to figure it out if they didn’t help me by suggesting different combinations after I told them my problem about my boe-bot going too much to the left or to the right. Next time, I have to remember to have more patience when experimenting with the boe-bot and not to panic on every mistake I make because all of us are going to encounter problems at least once with our boe-bot.
Chapter 3 Assessment: Projects
The answers for the Questions and Exercises are in the blog post “Day 10”, because I finished it last class and I was able to finish the projects during this class.
1) Modify RightServoTest.bs2 so that it makes a tone signifying the test is complete.
To modify the RightServoTest.bs2 so that it makes a tone to signify that the test is complete, I have to use the FREQOUT command. The FREQOUT command is used to control the frequency and duration of the piezospeaker and the piezospeaker produces the tone. First, I had to put the pin number of the piezospeaker as the first value of the command. Then, I had to type in the duration or how long the tone will last. Last, I have to type in the frequency or how high or low the ending tone of the program will be.
I didn’t have any challenges with this project, because I remembered that the FREQOUT command was used to control the piezospeaker and the piezospeaker is in charge of making the tone, so it was easy for me to modify the program. However, I needed to review myself a bit on how to write the FREQOUT command values in the right order because I mixed up the duration and the frequency values when I first typed it into the program. Instead of typing “FREQOUT 4, 500, 3000”, I wrote “FREQOUT 4, 3000. 500”. I was able to figure out that I messed up when I reread the section in Chapter 3 about the FREQOUT command.

2) Modify TestServoSpeed.bs2 so that you can use DEBUGIN to enter the pulse width for the left and right servo as well as the number of pulses to deliver in the FOR…NEXT loop. Use this program to control your Boe-Bot’s motion via the Debug Terminal’s Transmit Windowpane.

For this project, I had to modify the TestServoSpeed.bs2 so that I can use the DEBUGIN command to control the left and right servo and the number of pulses. I figured out that I had to put multiple variables in the program because I needed to put variables for the pulse width, the left servo, the right servo, and the counter for the FOR counter command. I found it challenging to figure out how to put the variables in the program. I looked at the solution for Project 2 and I found out that I had to write a DEBUGIN command for every variable except for the counter variable. After I wrote the DEBUGIN commands for the three variables, I had to modify the FOR counter command to 1 to NumberofPulses. Last of all, I had to modify the PULSOUT commands by putting in the variables after the pin number because I’m controlling the pulse width for the servos, instead of having a fixed pulse width.
How can pulse width be used to control Continuous Rotation servo speed?
Pulse width controls the speed and direction of the servos in the boe-bot. It is also a way to describe how long a pulse lasts. To control the servo speed of the continuous rotation servo, I need to type in a program that uses the PULSOUT command. The PULSOUT command’s duration argument is used to adjust the speed and direction of the servos. The program I need to use to control the servo speed of the servo is shown below:

 First, I have to type in 650 in the Debug Terminal Transmit Windowpane. To calculate the duration of the servos, I have to multiply 2 by 650 because the PULSOUT command’s duration argument is measured in 2 micro units. The equation will then be “Duration = 650 x 0.000002 seconds”. Next, I have to multiply the answer by 1000 and then I get the length of the pulse for PULSOUT 12, 650, which is 1.3 milliseconds.
Day 10
I didn’t get to finish the Chapter 3 Projects in class, but I was able to finish the questions and exercises and my answers so far are shown below:
Questions:
1) What are some of the symptoms of brownout on the Boe-Bot?
Some of the symptoms of brownout on the Boe-Bot are the program restarting when I’m not expecting it to, the boe-bot may get lost and go in an unexpected direction, and the program attemps to make the servos turn but then restarts again.
2) How can a piezospeaker be used to detect brownout?
The speaker can make different tones that depend on the frequency of the high/low signals it receives from the BASIC Stamp and can be used to emit tones when the BASIC Stamp is reset everytime the boe-bot resets due to a brownout.
3) What is a reset?
A reset is when the Boe-Bot shuts down due to a brownout and then reset the program starting from the beginning until the end.
4) What is an initialization routine?
An initialization routine is all the commands necessary to get a device or program running and often includes variable values, beeping noises, and self testing.
5) What are three (or more) possible mistakes that can occur when disconnecting and reconnecting the servos?
The first possible mistake is that the right servo and the left servo might be switched and attached on the wrong pins. The second possible mistake are the direction in which the servo is attached (their colors do not match the circuit drawing in the book). The third possible mistake is when the person forgets to switch the power switch back to zero and leaves it on 2.
6) What command do you have to change in RightServoTest.bs2 to test the left wheel instead of the right wheel?
The PULSOUT commands can be modified from P13 to P12 because P13 controls the right wheel, while P12 controls the left wheel.
Exercises:
1) Write a FREQOUT command that makes a tone that sounds different from the reset detect tone to signify the end of a program.

2) Write a FREQOUT command that makes a tone (different from beginning or ending tones) that signifies an intermediate step in a program that has been completed. Try a value with a 100 ms duration at a 4 kHz frequency.

Activity #4: Testing Speed Control With The Debug Terminal:
This is the chart and graph for Activity #4 for Chapter 3 that we worked on today. In this class, I had to use the Debug Terminal’s Transmit windowpane. I had to calculate the RPM for a range of pulse widths and make a chart and a graph of the results. First, I had to make a reference point on the right wheel of the boe-bot so that I can count how many times the wheel rotates. Next, I had to run the TestServoSpeed.bs2 program and enter the values in te Debug Terminal’s Transmit windowpane. After counting the times the wheel rotates, I have to find the RPM by multiplying the value by 10 because the servo turns only for 6 seconds. The pictures below show the program I used, the debug terminal transmit windowpane, and the chart and graph for my results:

![]()


Day 9
In this class, we started working on our own boe-bots. This meant that all of us each had our own individual boe-bot, unlike before where we had a partner and groups.
When we first got our boe-bots, we had to reassemble the circuit with the piezospeaker and the jumper wires like we did last class. After this, we had to test the piezospeaker again using a program to test whether the piezospeaker would give out a beeping sound. If the piezospeaker gave out a beeping sound, it meant that the circuit was built correctly. This is the program I used:
 When I first tried the program, the piezospeaker did not produce a beeping sound so I disconnected the usb cable connecting the boe-bot and I rechecked the wiring of the circuit and realized that one of the wires were loose. The piezospeaker was able to produce a beeping sound after fixing the wire. The first thing I learned was that the FREQOUT command is used to send high/low signals to the speaker. When I ran the program, the first thing that happened was that a “Beep!!!” message came up almost the same time that the piezospeaker produced the beeping sound. After this, the DO…LOOP command was executed and the message “Waiting for reset…” came up again and again on the screen.
The next thing I had to do was to test speed control using the debug terminal. To do this, I had to use the debug terminal’s transmit windowpane. The transmit windowpane is used to send messages to the BASIC stamp, making it easier to test the servos at different pulse widths. Next, I learned about the DEBUGIN command. The DEBUGIN command is used to make the BASIC stamp receive the messages and store it as one or more variables in the terminal.
Next, I had to make another program to test the servos by using the Transmit windowpane. The first thing I needed to do was to put the boe-bot on its nose and then type in 650 as the first value in the Transmit windowpane. I then had to see whether the servo moved full speed clockwise for six seconds. Next, I had to put 850 and see whether the servo moved full speed counterclockwise.
Next, I had to try measuring the RPM of the wheel. First, I had to make a mark on the wheel to see how far it moves at 6 seconds. I then use the DEBUG terminal to put in the values. To get the pulse width, I had to multiply the number of wheel turns by 10. The program I used is displayed below:


